Virtual memory or the paging file in Windows 11 allows the system to use physical RAM more efficiently by offloading some programs and files to the storage.
It helps temporarily store or remove the files that are allocated in the RAM of our system.
The less frequently used files are on the lower end of the priority list and can be stored in the virtual memory, freeing space in the RAM. This way, the system can prioritize the more frequently used files and applications.
This way, our system can achieve faster and better performance. Virtual memory essentially enhances the performance of our system and prevents the system from crashing if it runs out of memory.
The system itself is equipped to adjust the virtual memory or paging file on its own, taking various factors into account.
Sometimes you may need to set the virtual memory manually according to your needs.
Also read: How to Install Windows 11 on VirtualBox
If you notice slow performance and response time of your device. If you are working with applications that require a specific amount of memory, you may want to adjust it manually.
In cases where the system shows a warning like “Out of memory,” it is better to have a hang of how to increase virtual memory in Windows 11.
Windows 11 allows you to change the page file size. There are two ways in which you can increase the virtual memory in Windows 11.
In this article, we will talk about both ways of increasing virtual memory.
Increase virtual memory in Windows 11 using system settings
Before we begin with the tutorial, it is very important to understand that these settings should only be changed when you have a clear knowledge of what you are doing. It is advised that you have a valid reason to change these settings.
You can increase the virtual memory in Windows 11 by following these steps:
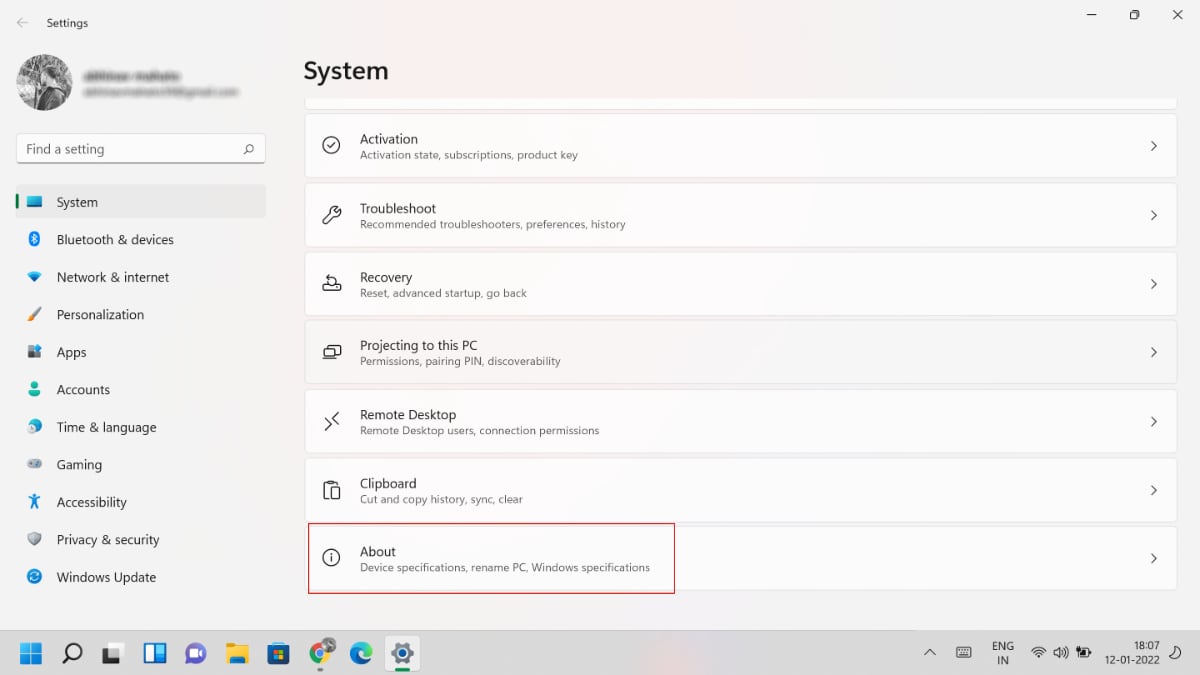
1. Open Settings on your device.
2. Click on the System option.
3. Go to the About section.
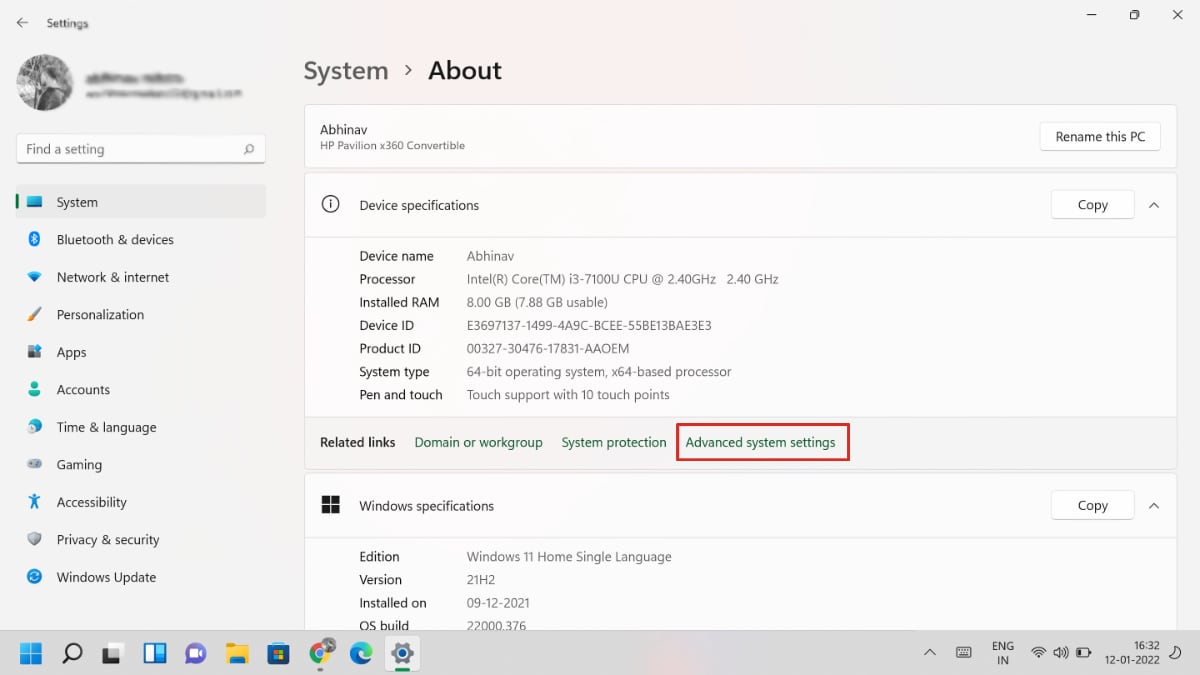
4. Locate the Related links section on the right pane.
5. Click on Advanced system settings found on the right side of your screen.
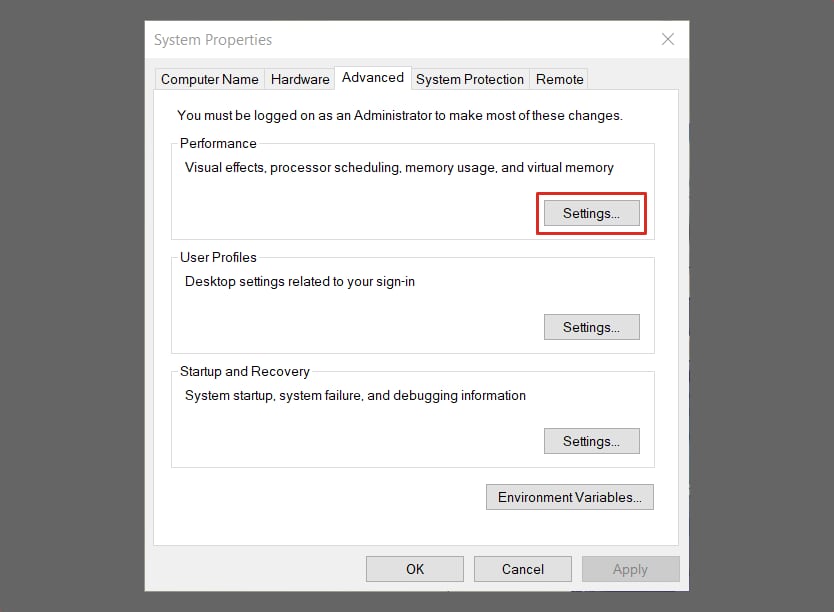
6. Go to the Advanced tab.
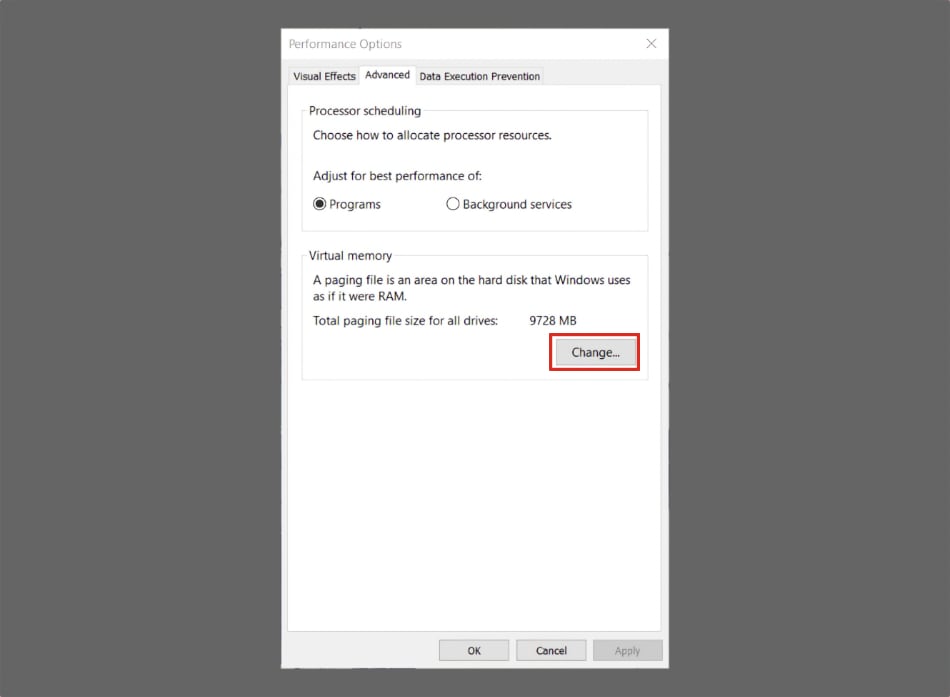
7. Locate the Performance section under the Advanced tab.
8. Click on Settings in the Performance section.
9. Go to the Advanced tab again.
10. Click the Change button under the Virtual memory section.
11. Uncheck the Automatically manage paging file size for all drives.
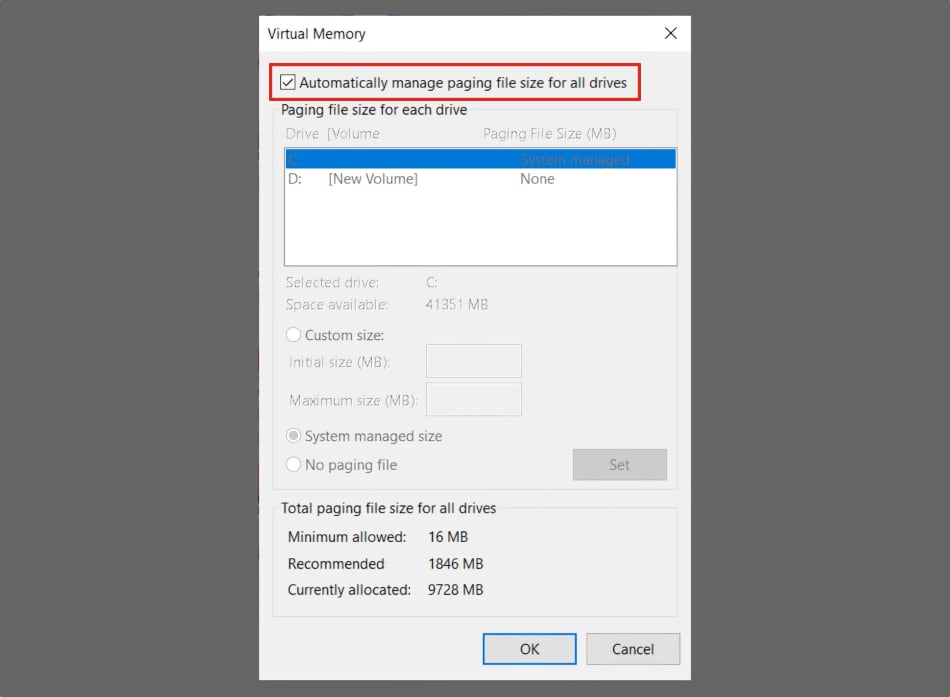
12. Select the Custom size option.

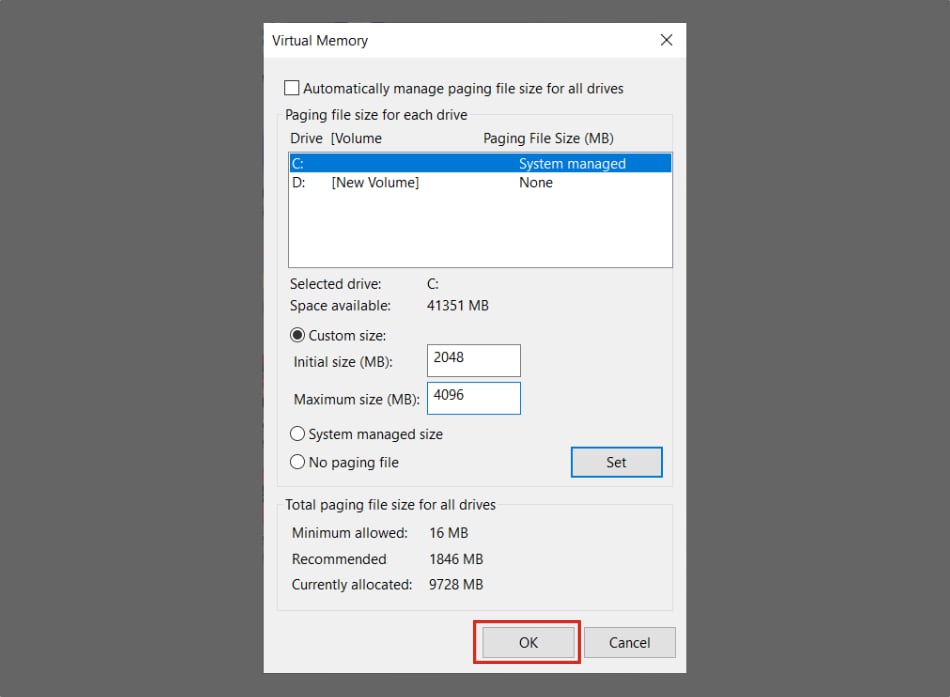
13. Change the Initial size and Maximum size for your virtual memory.
The initial and maximum sizes are specified in megabytes. It is advised to adjust the initial size of the virtual memory to one and a half times the total available memory. Set the maximum size as three times the available memory.
That said, the size of the paging file can always be changed later if required.
14. Click the Set button.
15. Then click on OK.
16. Click on the OK button once again.
17. Restart your device.
If you follow these steps properly, you will be able to increase the virtual memory size in Windows 11.
To go back to the original settings of the paging file size, just check the Automatically manage paging files size for all drives box that we unchecked in step 11.
Increase virtual memory in Windows 11 using the command prompt
Moving on to the second method that you can use to increase virtual memory size in Windows 11. Follow these steps to change the virtual memory size:
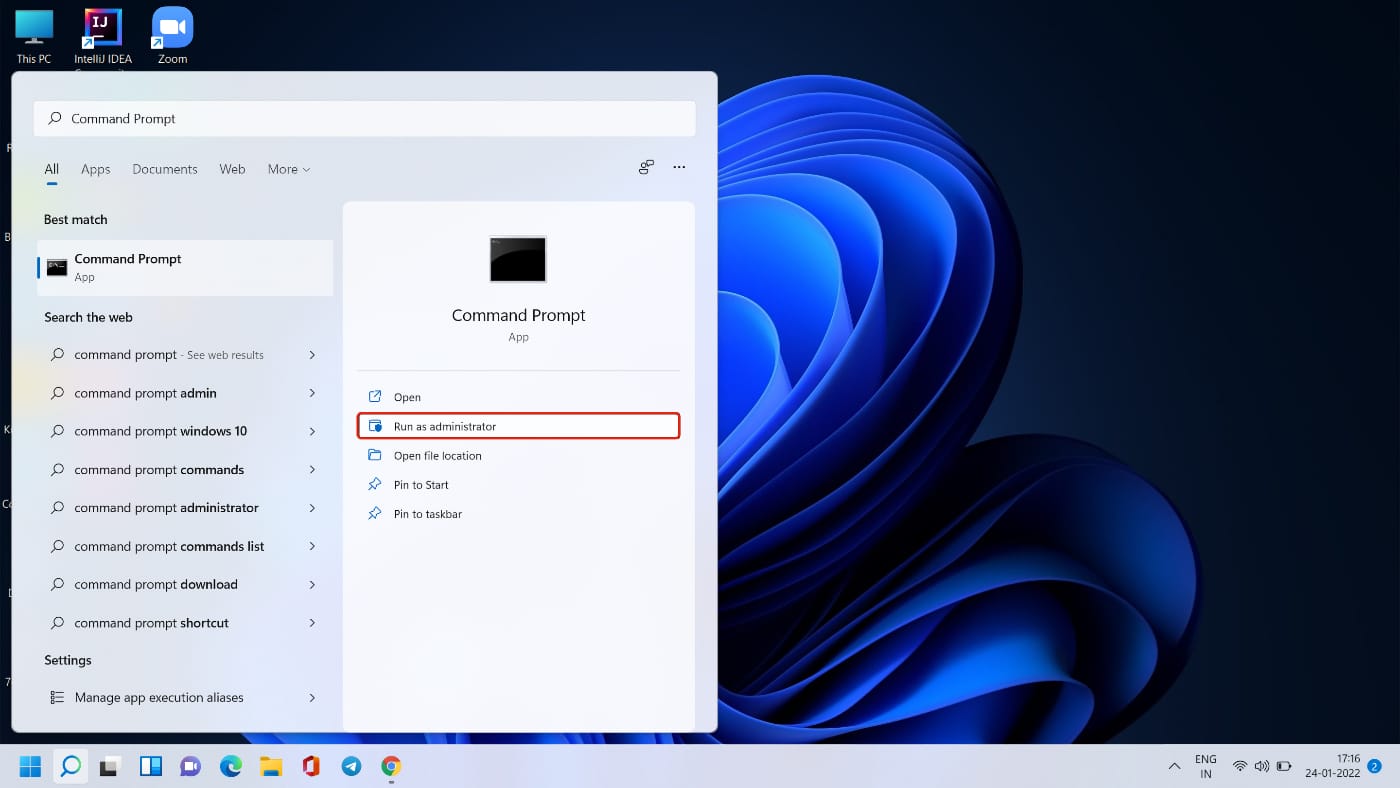
1. Click on Start and search for Command Prompt in the search bar.
2. Right-click on the top result and click Run as administrator.
3. To check the current status of your virtual memory, type in the following command:
wmic pagefile list /format:list4. Press Enter.
5. Now, type in the following command to switch to custom virtual memory settings:
wmic computersystem where name="%computername%" set AutomaticManagedPagefile=false6. Press Enter.
7. To set the initial size and maximum size of the paging file, use the following command:
wmic pagefileset where name="C:\\pagefile.sys" set InitialSize=YOUR-INIT-SIZE,MaximumSize=YOUR-MAX-SIZEHere is an example that sets the initial size to 9216 MB and the maximum size to 12288 MB:
wmic pagefileset where name="C:\\pagefile.sys" set InitialSize=9216,MaximumSize=122888. Press Enter.
9. Restart your device by typing this command:
shutdown -r -t 0010. Press Enter once again.
Make sure you type in the correct commands in the command prompt, and the virtual memory size will be changed after your system restarts.
To avoid any errors, double-check the values of the initial and maximum size of the virtual memory.
In case you want to switch to the original default settings of the system, you can revive the original settings.
Use this command to let Windows 11 manage the virtual memory size:
wmic computersystem where name="%computername%" set AutomaticManagedPagefile=trueThen for one last time, restart your device.
Windows 11 also provides a disable feature that helps disable the virtual memory completely.
Although possible, it is not recommended to do so. This is because when you disable the virtual memory completely, you may experience your system behaving weirdly.
Some applications may cease to function, and others may crash randomly.
By using one of the two ways mentioned above, you can increase the virtual memory size in Windows 11.
Comments