If you’re a Mac user, you might have been intrigued by the new Windows 11. The OS offers many features like the new start menu, widgets, and snap layouts and also supports consistent PC gaming.
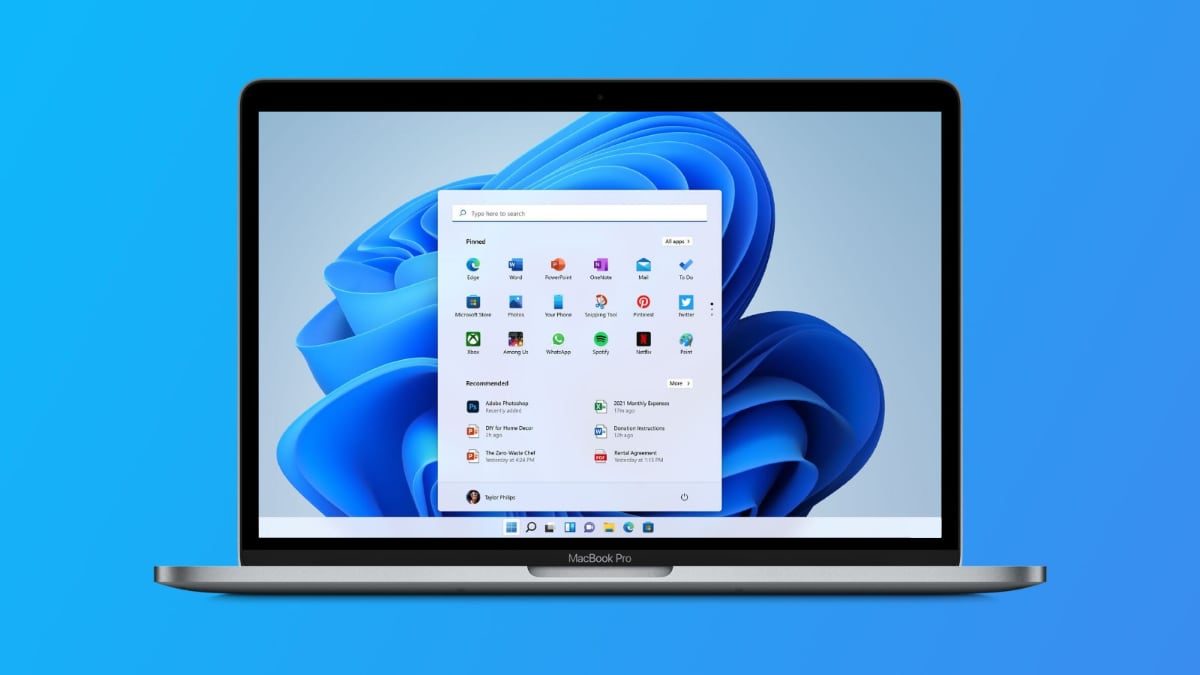
Whether it is for the features or for the games, you might want to try out Windows 11 on your Mac system.
Unfortunately, Macs can’t run Windows 11 directly. That being said, the best way to run Windows 11 on Mac is by virtualizing.
Also read: How to set live wallpaper in Windows 11
Today, in this article, we’ll show you how you can run Windows 11 virtually on Macs.
We’ll be using UTM for this method since it’s free and is easy to use.
Table of Contents
How to Run Windows 11 Virtually on a Mac
Before we get started, let’s first download the latest version of the UTM.
You can download UTM from the official website by clicking here.
Or, you can install the latest beta, including all new changes from GitHub. To download the latest beta version of UTM, click here.
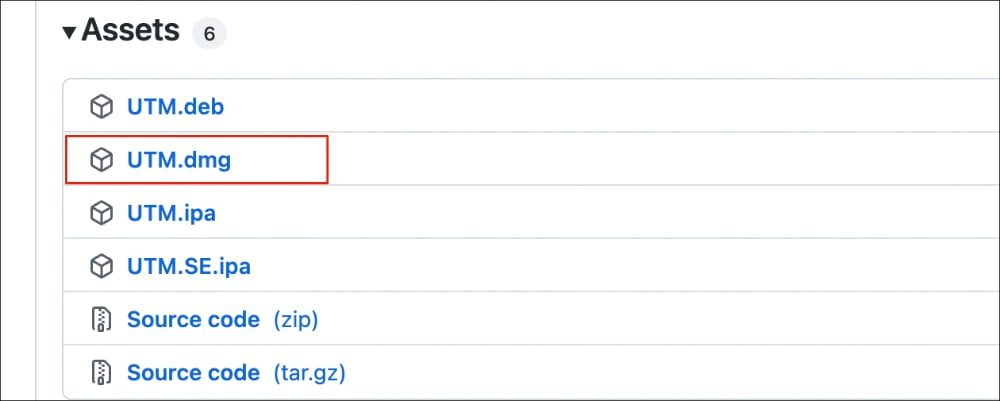
Steps to download UTM from Github
1. Simply click the link above and scroll down on the page until you see Assets.
2. Now, click on UTM.dmg and download the file.
3. Once downloaded, head to the Downloads folder and open the installer.
4. Now, drag UTM to the Applications folder.
Steps to run Windows 11 virtually on Macs
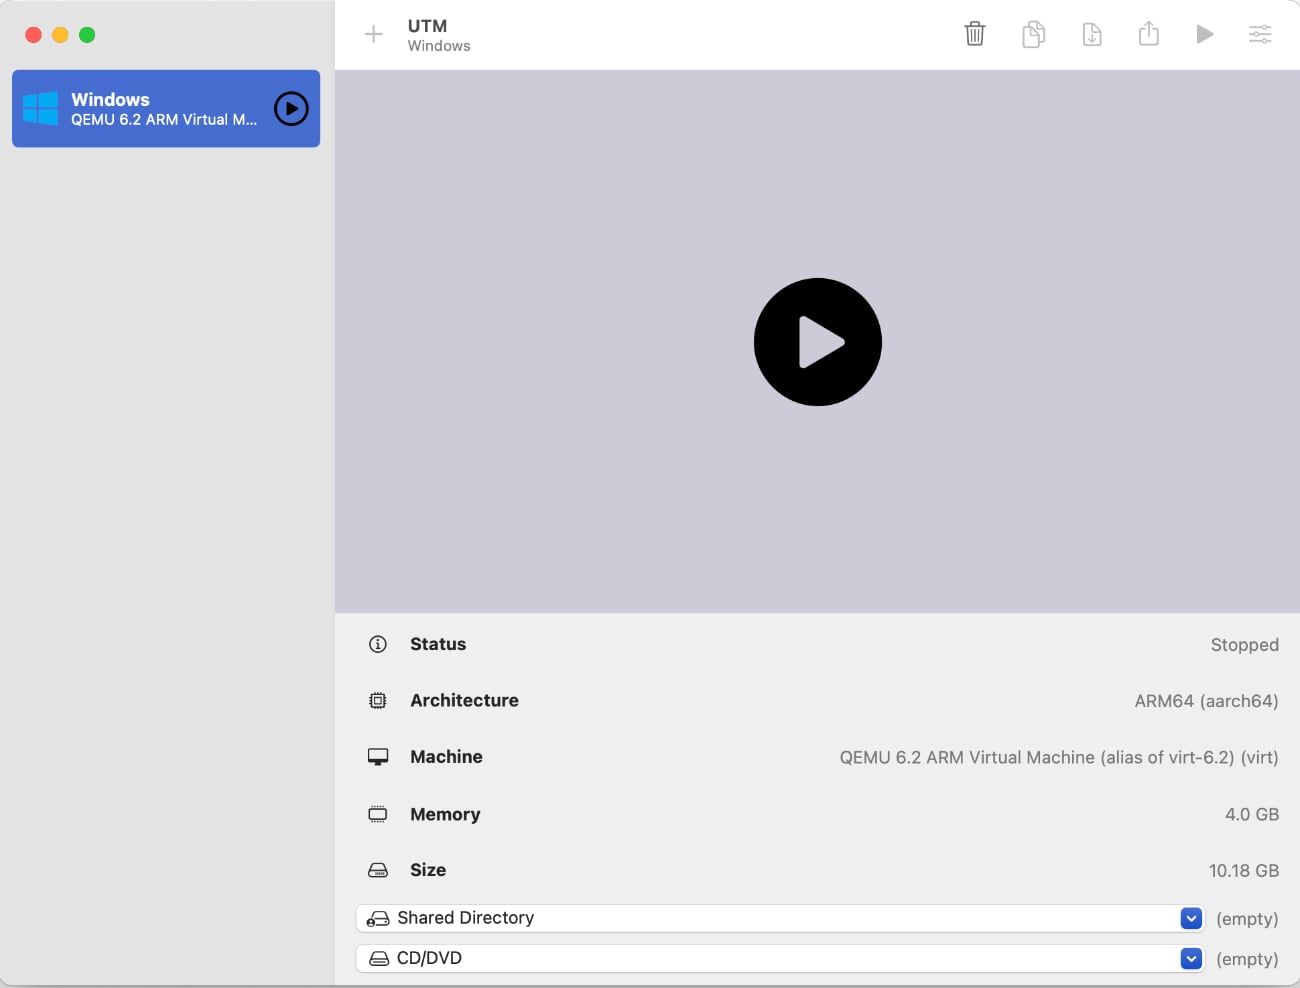
1. Open the UTM app on your Mac.
2. Click on Create a New Virtual Machine.

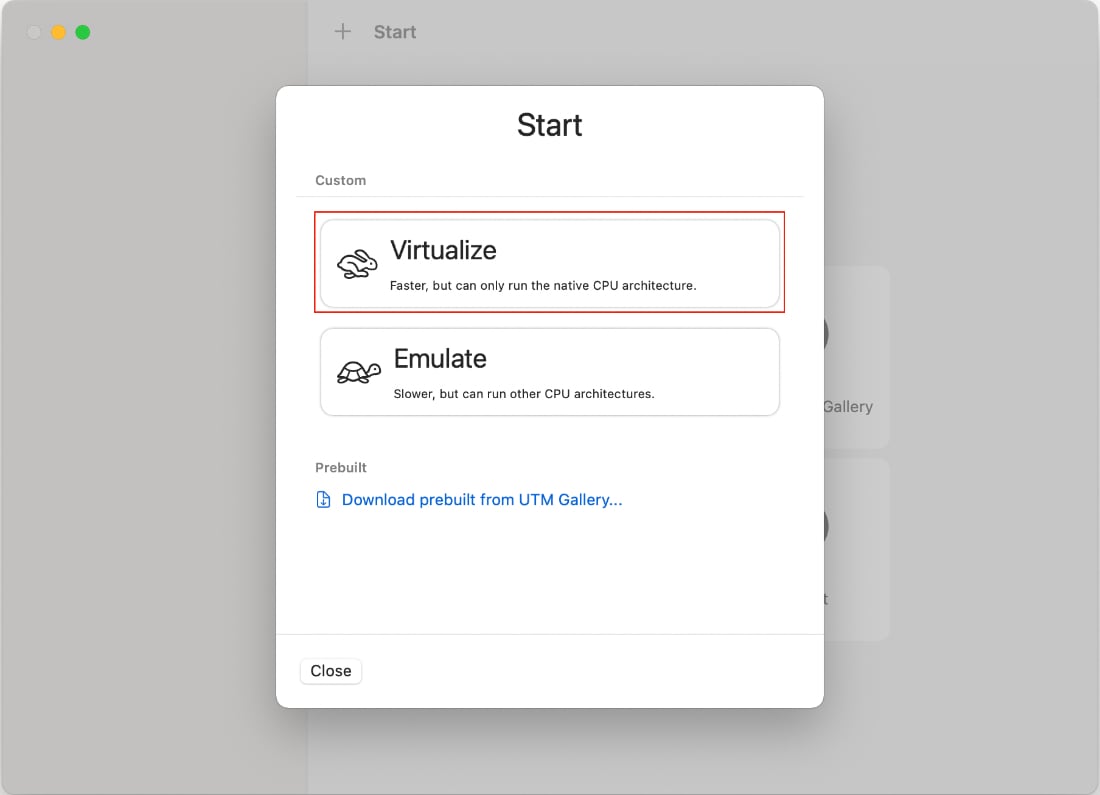
3. Now, you’ll see two options – Virtualize and Emulate. Since you’ll be installing the OS virtually, simply click on the Virtualize option.
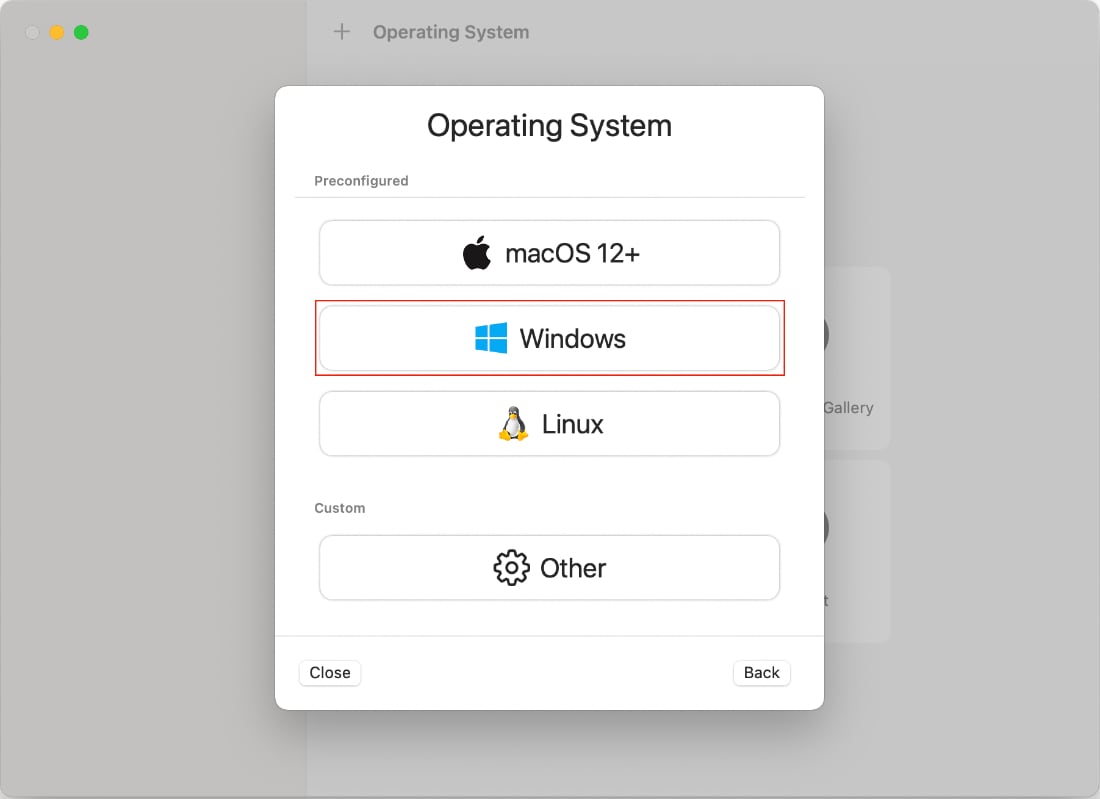
4. Here, you’ll need to choose the operating system. Click on Windows.
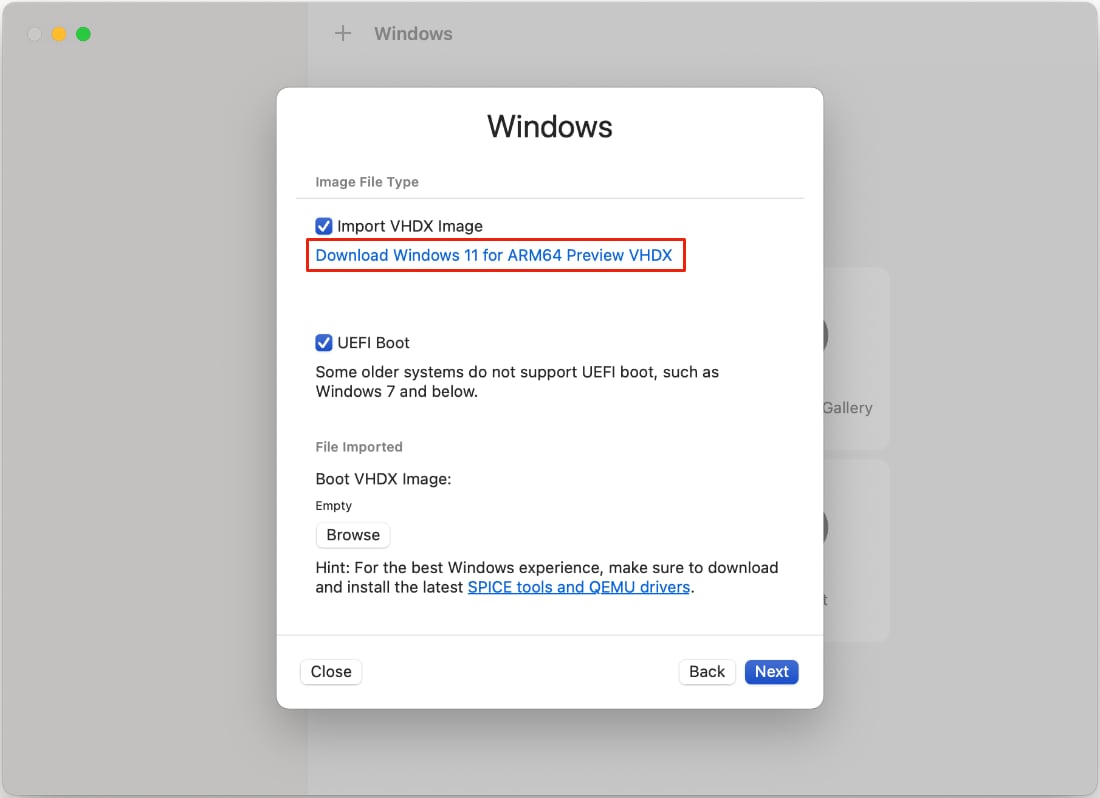
5. Now, it will let you import the VHDX (Hyper-V virtual hard disk) file. In order to do this, let’s first download the preview build.
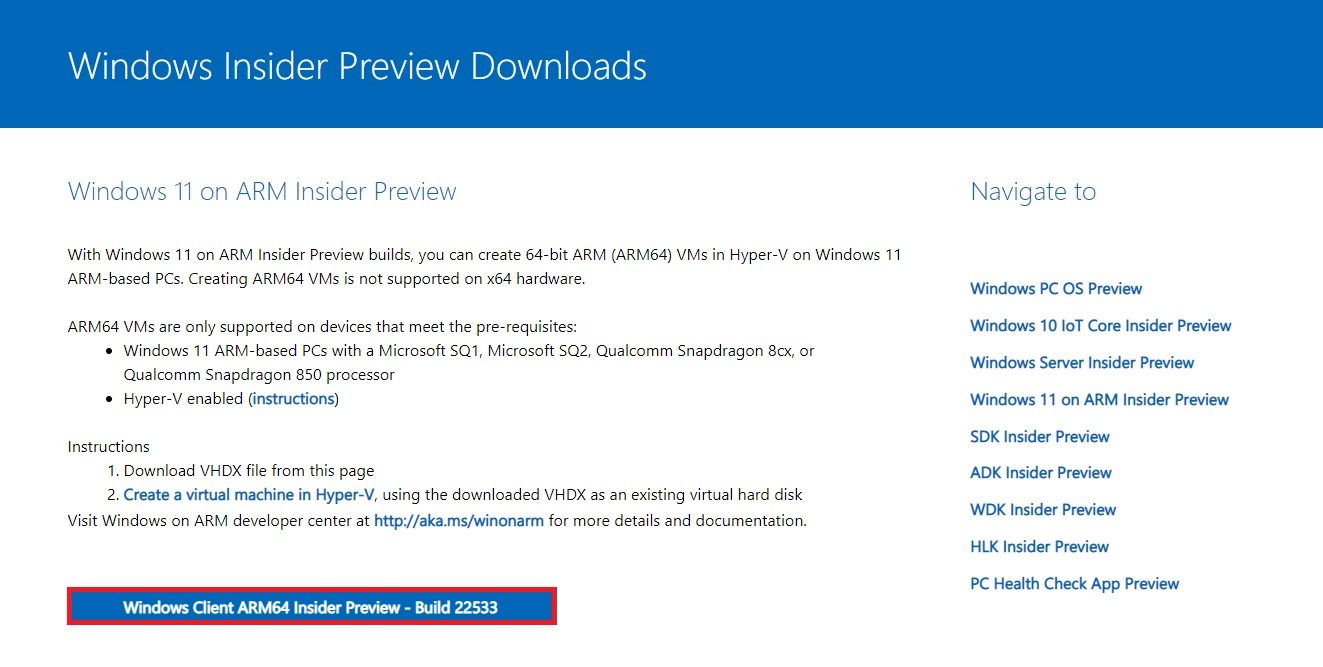
So, click on the Download Windows 11 for ARM64 Preview VHDX option above.
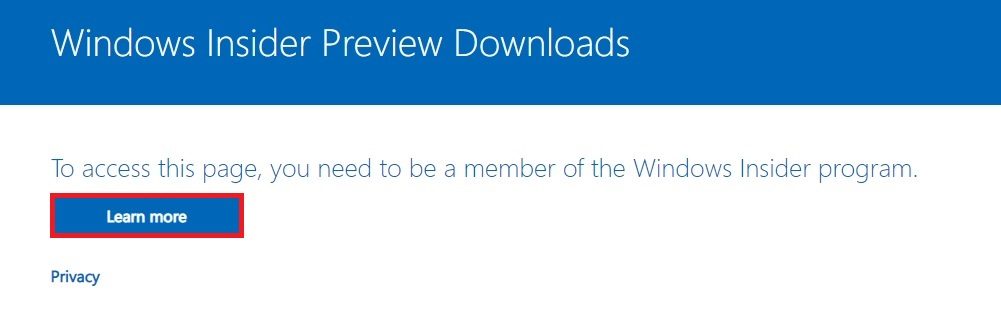
6. Once you click on it, you’ll be redirected to the Windows 11 ARM64 Insider Preview page. Here, sign up for the Windows 11 Insider Program.
7. Now, log in to your account. Click on Learn more.
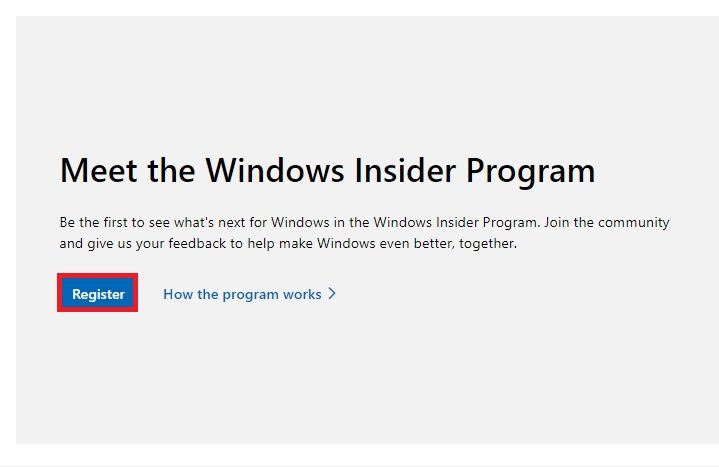
8. Click on Register.
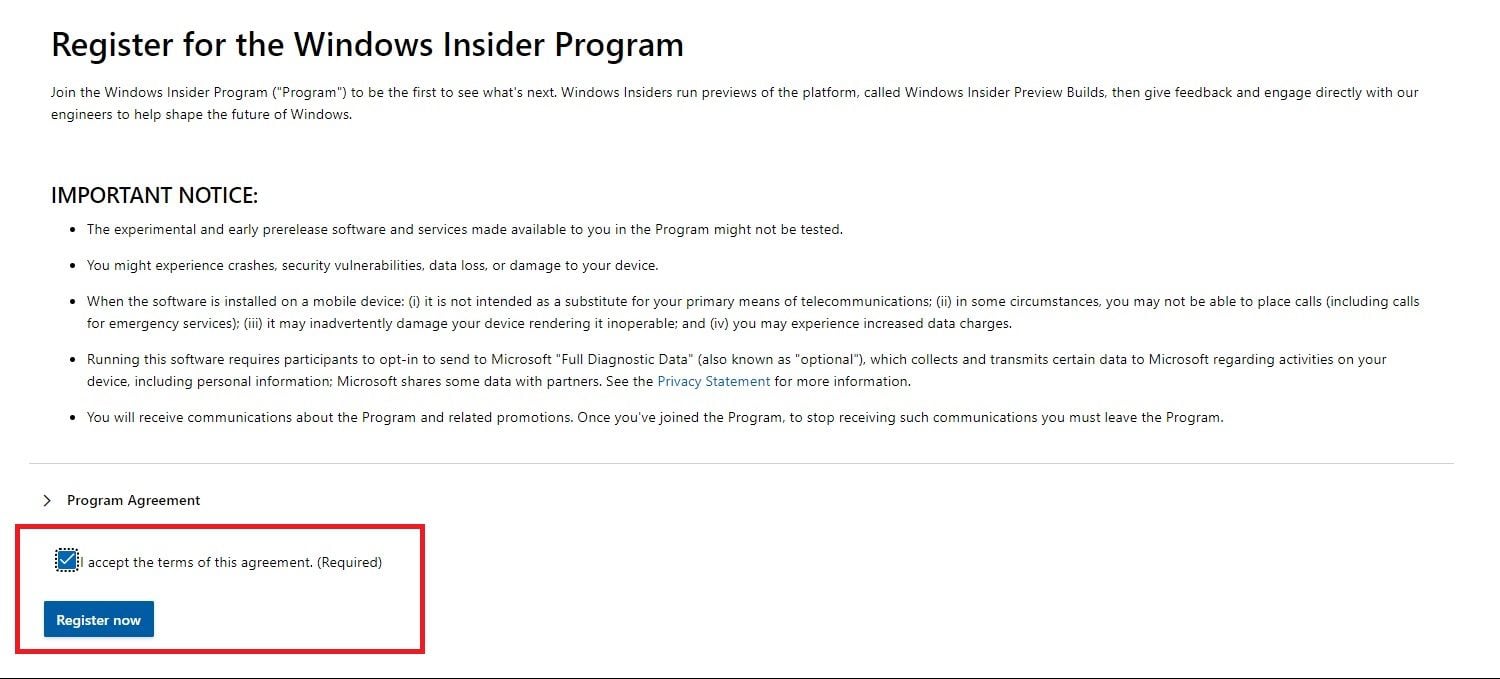
9. Next, click on Register now.
10. Click on Flight now.

11. After finishing the steps above, you’ll be enrolled in the Windows Insider Preview program. So next up, download the Windows 11 disc image (VHDX file).
12. Once you download Windows 11, head back to the UTM app and click on Browse and select the Windows 11 disc image (VHDX file).
Note: Several users have reported that directly installing Windows 11 from the VHDX file can corrupt the virtual machine. You can try it out for yourself. If it works, great, or else, we’ll need to convert the VHDX file to QCOW2 format.
Follow the steps below to convert the VHDX file to QCOW2 format:
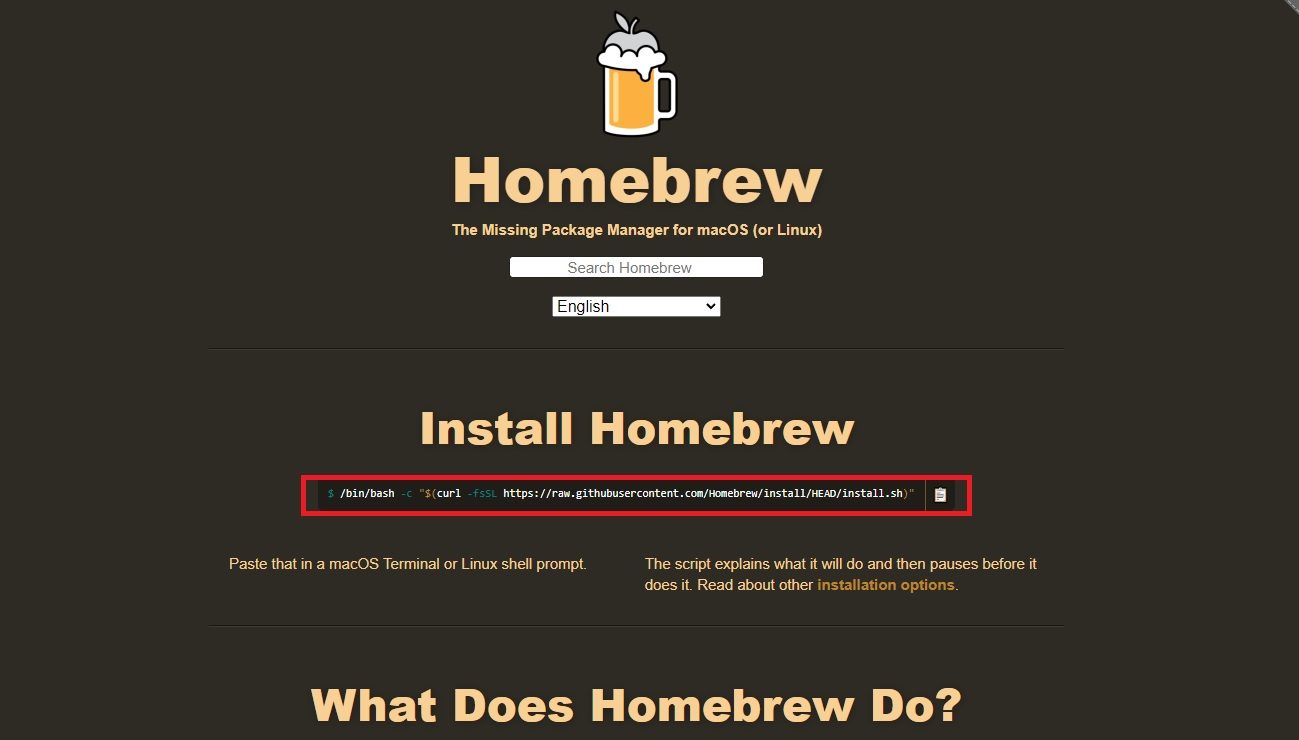
13. On the Homebrew website, you’ll see an option to install Homebrew. Here, simply click on the clipboard button 📋, which will copy the command that’ll let you install Homebrew.
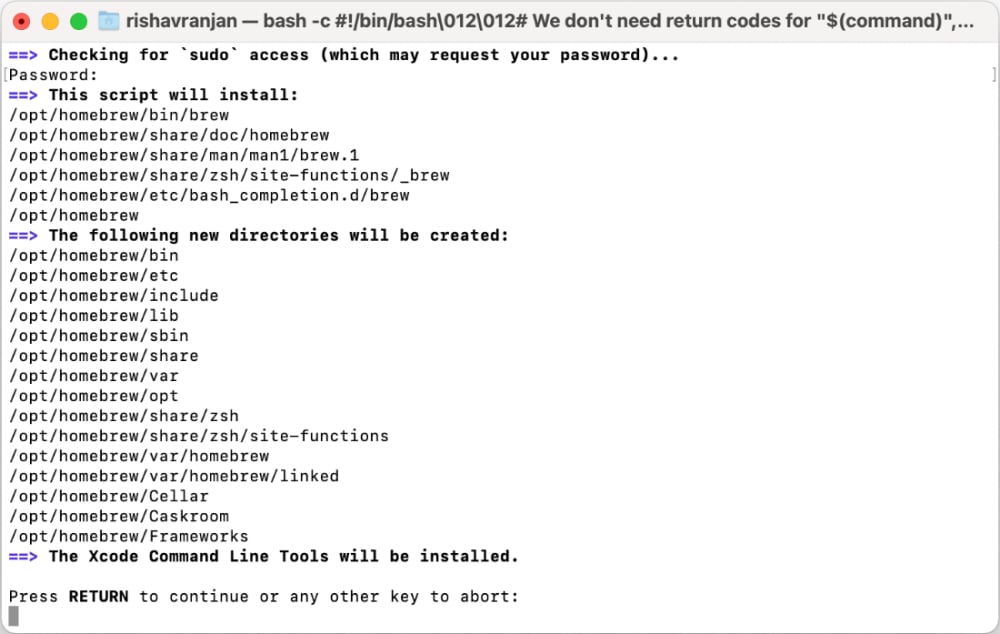
14. Now, open the Terminal, paste the code you just copied, and press return on your keyboard.
15. Here, it will ask for your Mac’s password. After inputting the password, it will let you download Homebrew.
16. Once you hit return, it will show you the list of things that will be installed. Hit return to continue.
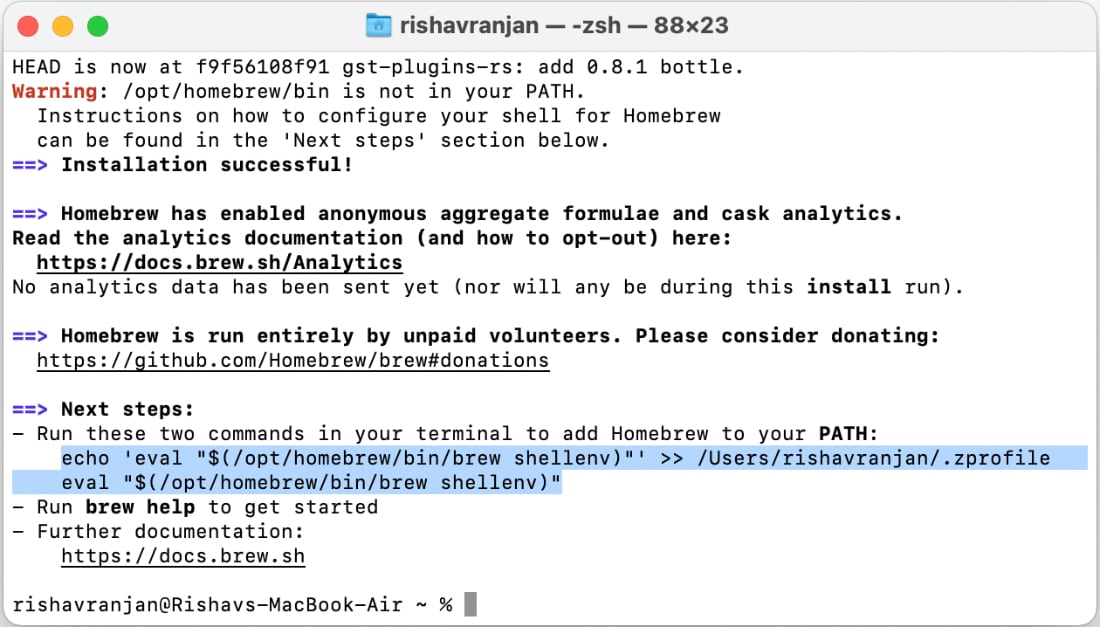
17. After everything’s installed, it will show you the next steps to set the path. Simply copy the commands. There will be two lines. Paste it and hit return.
18. Next up, we need to install QEMU. For that, type brew install qemu and hit return.
After it’s installed, we can now convert the VHDX file to QCOM2 format.
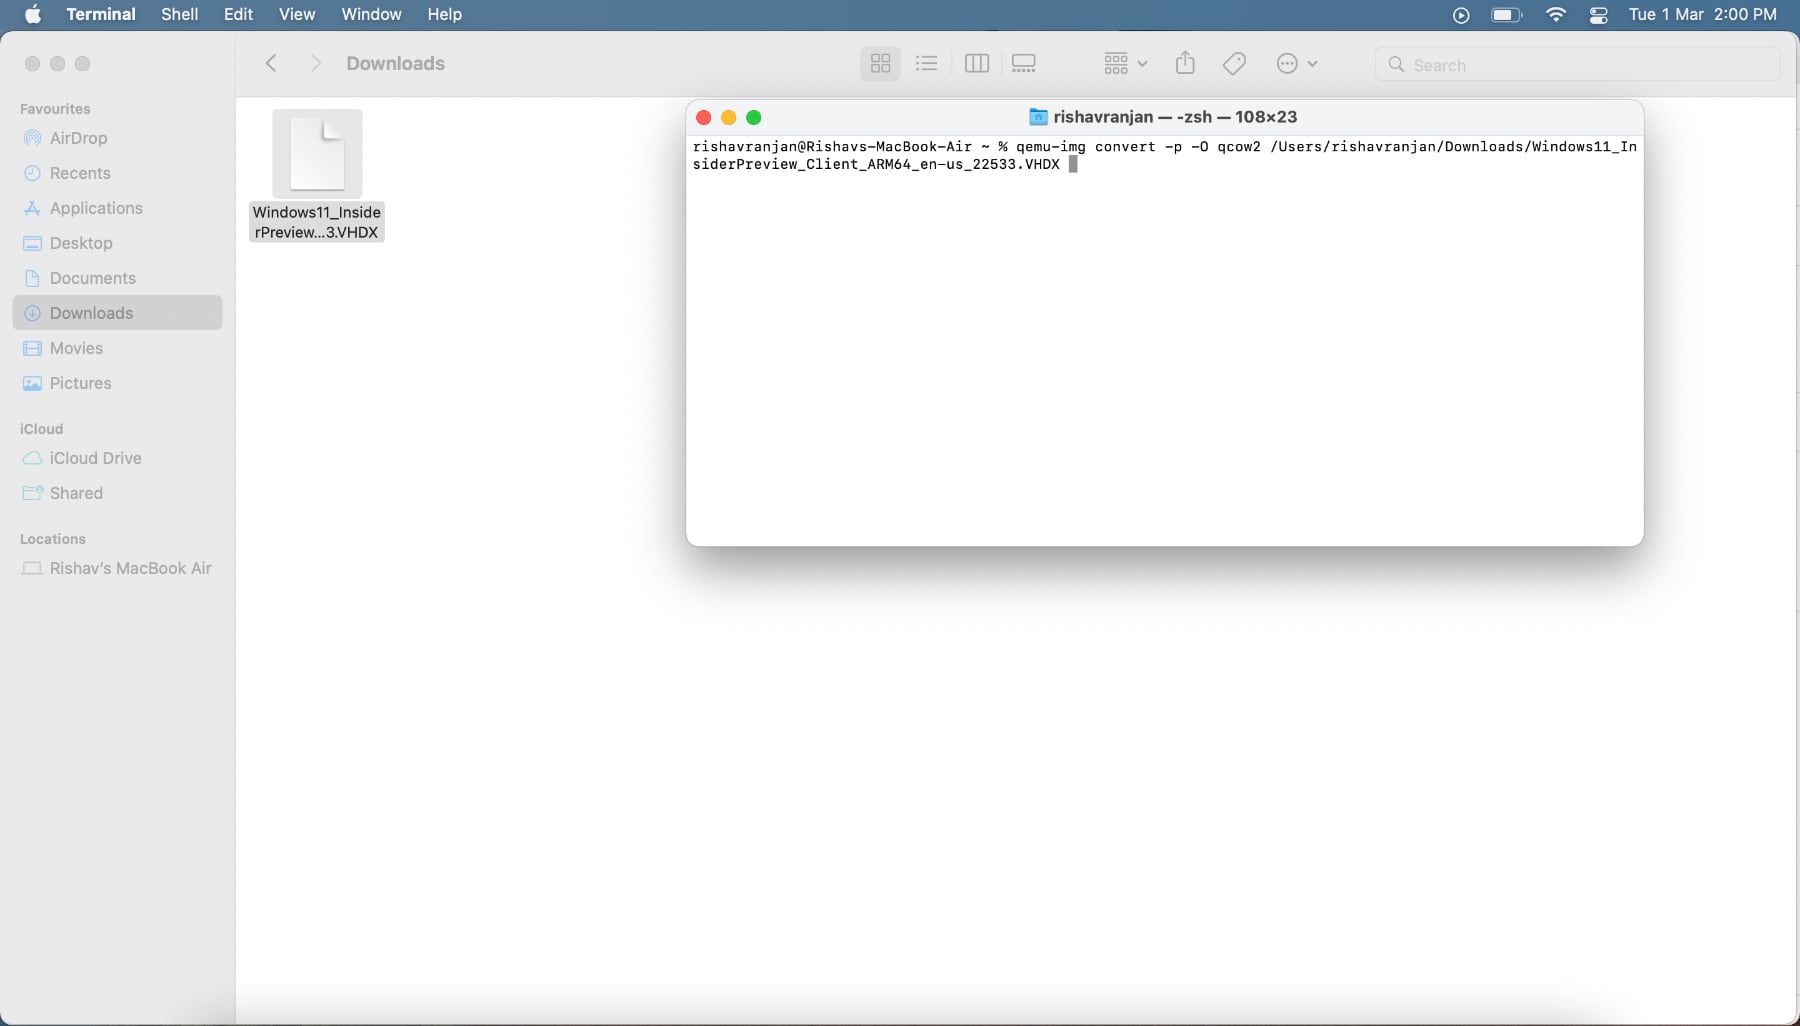
19. Type the following command in Terminal – qemu-img convert -p -O qcow2. Now, open the downloads folder and drag and drop the Windows 11 Insider Preview VHDX file into the terminal window.
So, it will look something like this – qemu-img convert -p -O qcow2 /Users/rishavranjan/Downloads/Windows11_InsiderPreview_Client_ARM64_en-us_22533.VHDX.
20. Now, drag and drop the VHDX file again, but this time, change the .VHDX file extension to .qcow2 in the Terminal.
Finally, the command will look something like this – qemu-img convert -p -O qcow2 /Users/rishavranjan/Downloads/Windows11_InsiderPreview_Client_ARM64_en-us_22533.VHDX /Users/rishavranjan/Downloads/Windows11_InsiderPreview_Client_ARM64_en-us_22533.qcow2. Now, press return.
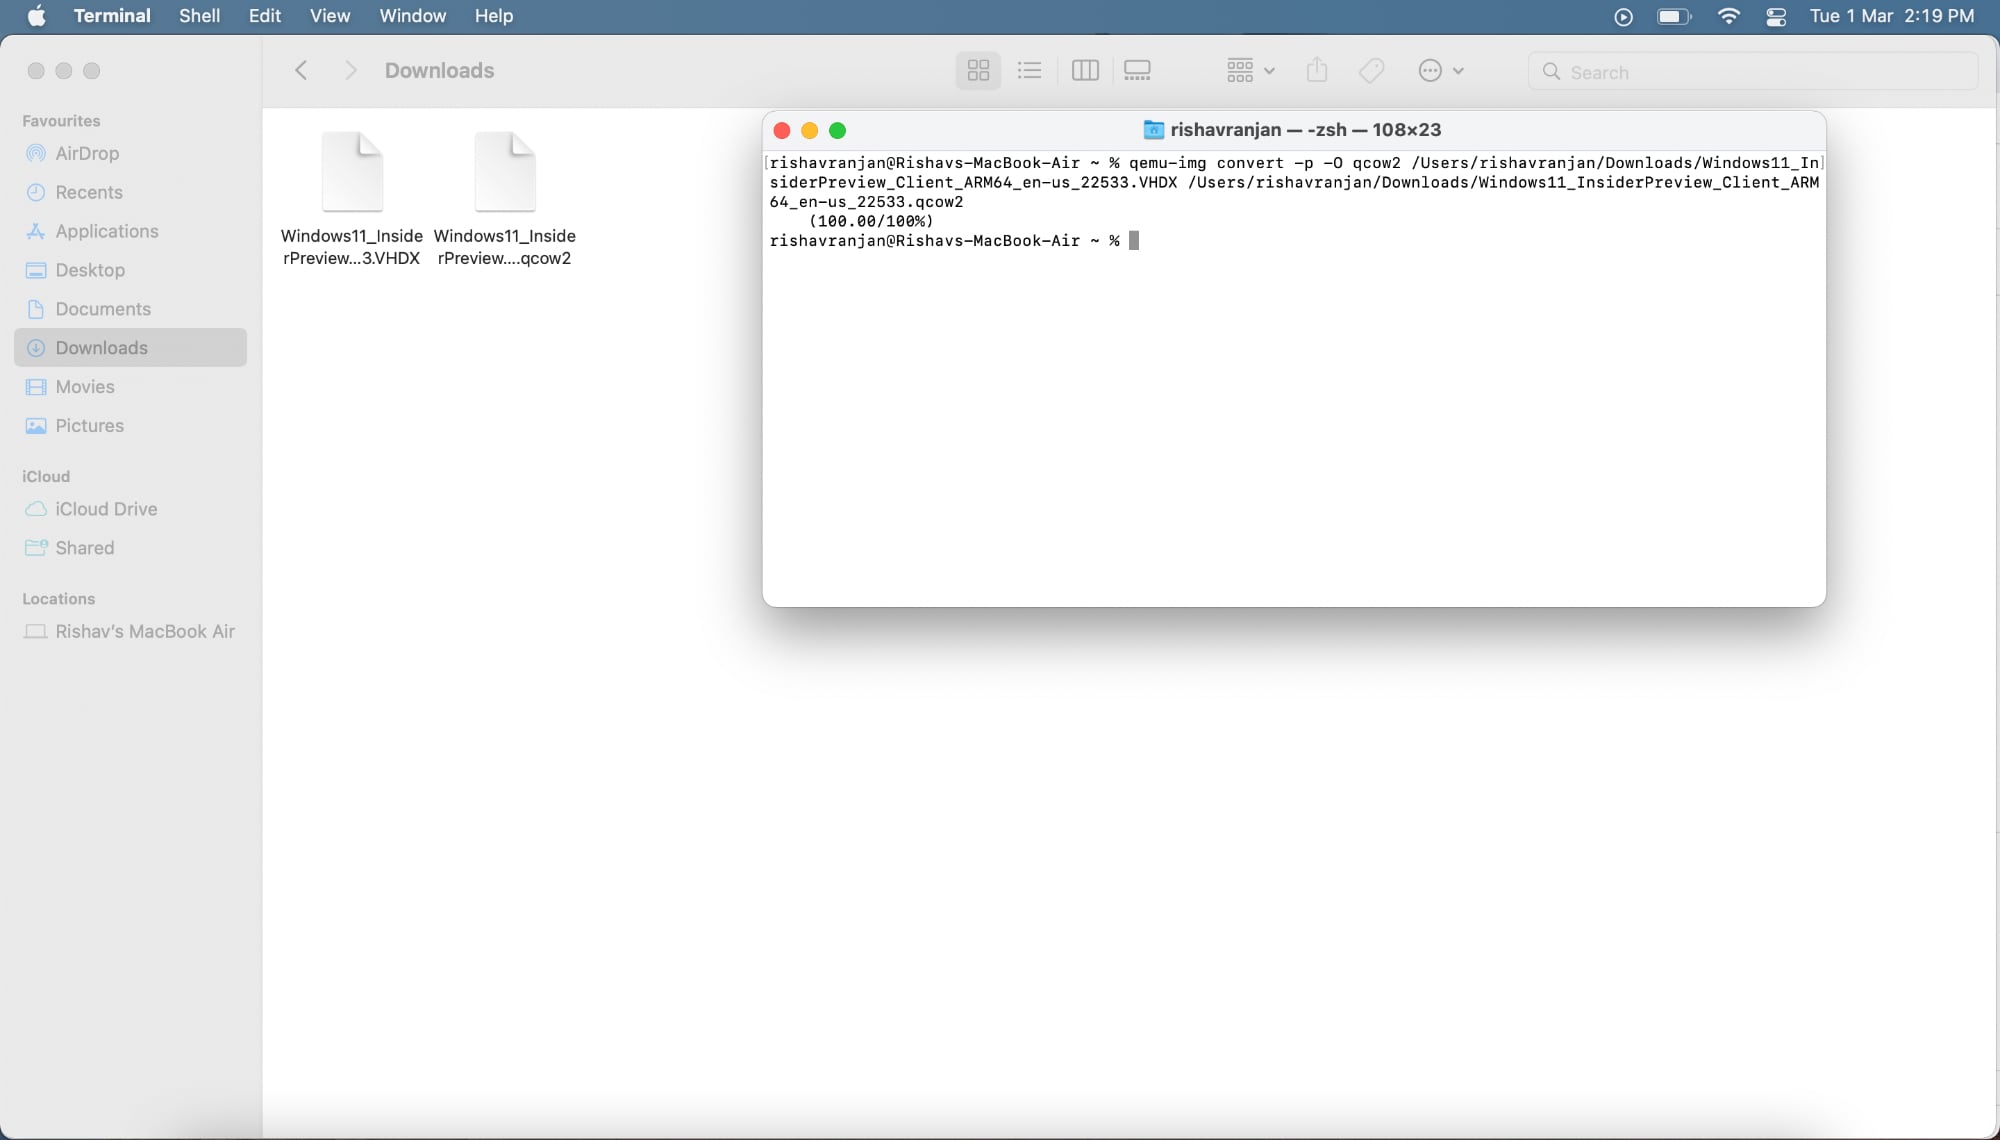
The VHDX file will be converted to QCOW2 format within the same folder.
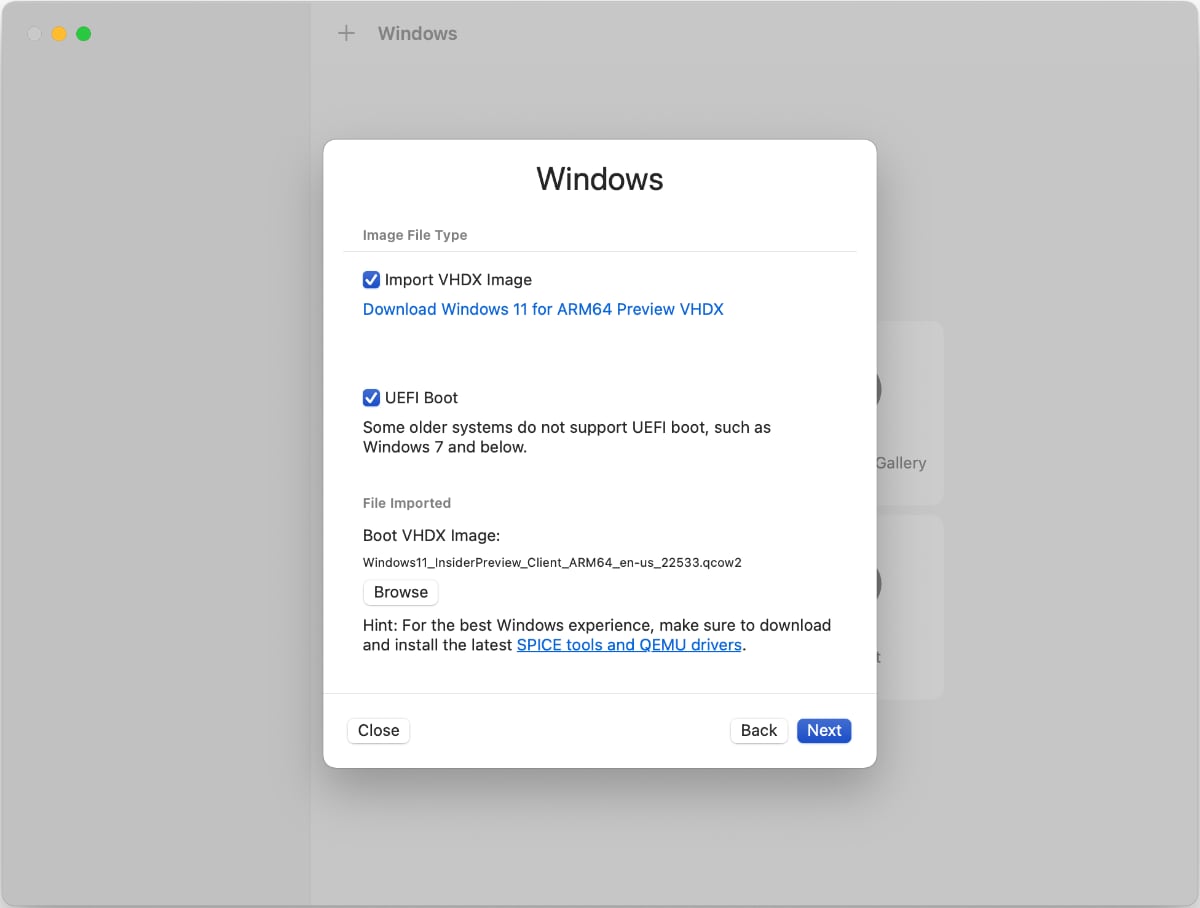
21. Coming back to the UTM app, now import the QCOW2 file. Click on Browse, then select the QCOW2 file and click on Next.
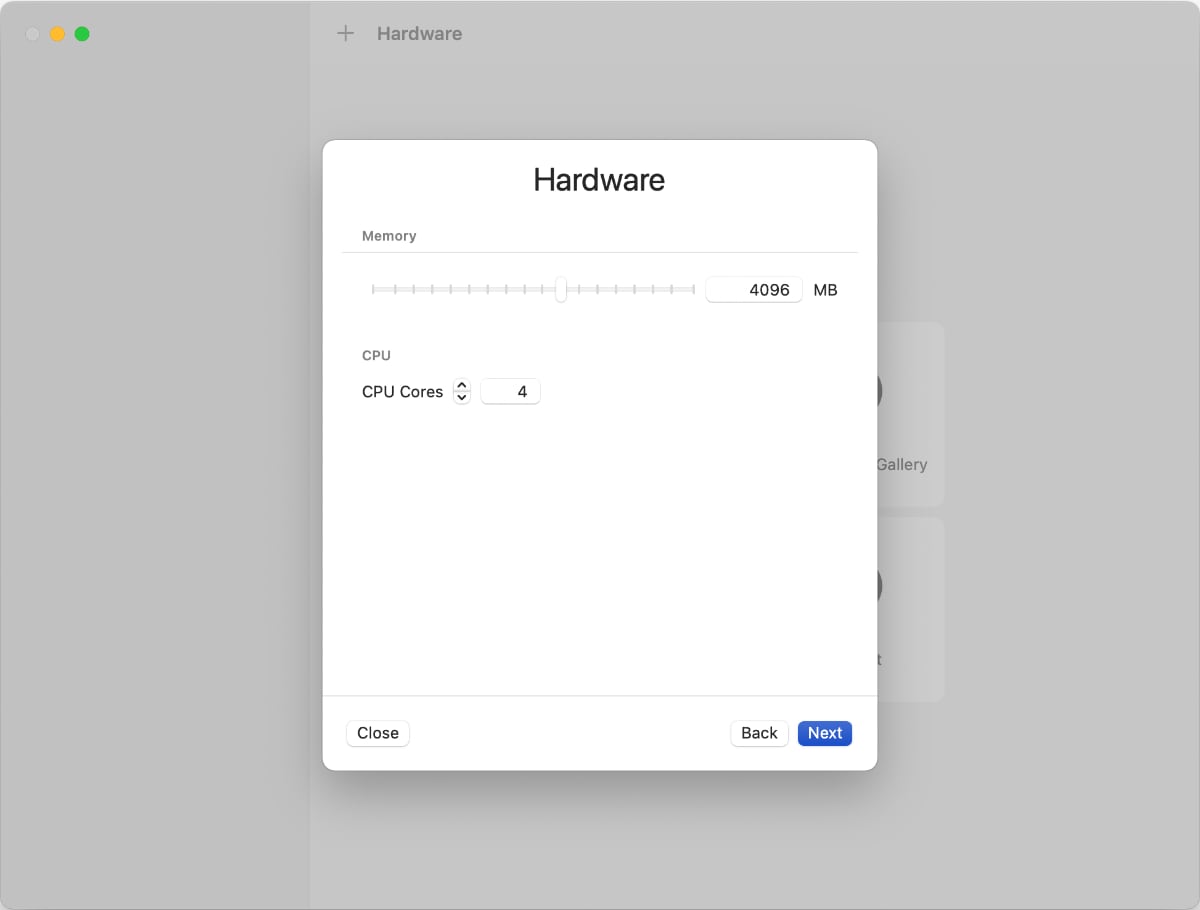
22. Here, you need to allocate memory and CPU cores for the virtual machine. It is advised to use half of the memory on your Mac.
So, if your Mac has 8 GB memory, keep the slider at 4096 MB. Same for the cores, for a Mac that has 8 cores, select 4 cores.
23. Now, it will ask for a shared directory. Just skip this step. Click on Next.
24. Now, it will show you the summary of the options you selected. Simply hit Save.
25. Here, click on the play button, as shown in the image below. This will start UTM, and once it’s done, it will show you the UTM logo and let you set up Windows 11.
26. Setup region, Wi-Fi, and other details, and after that, you’ll be inside the system.
Install drivers for Windows 11 on the virtual machine
Once you have successfully installed Windows 11, you’ll need to install all the drivers.
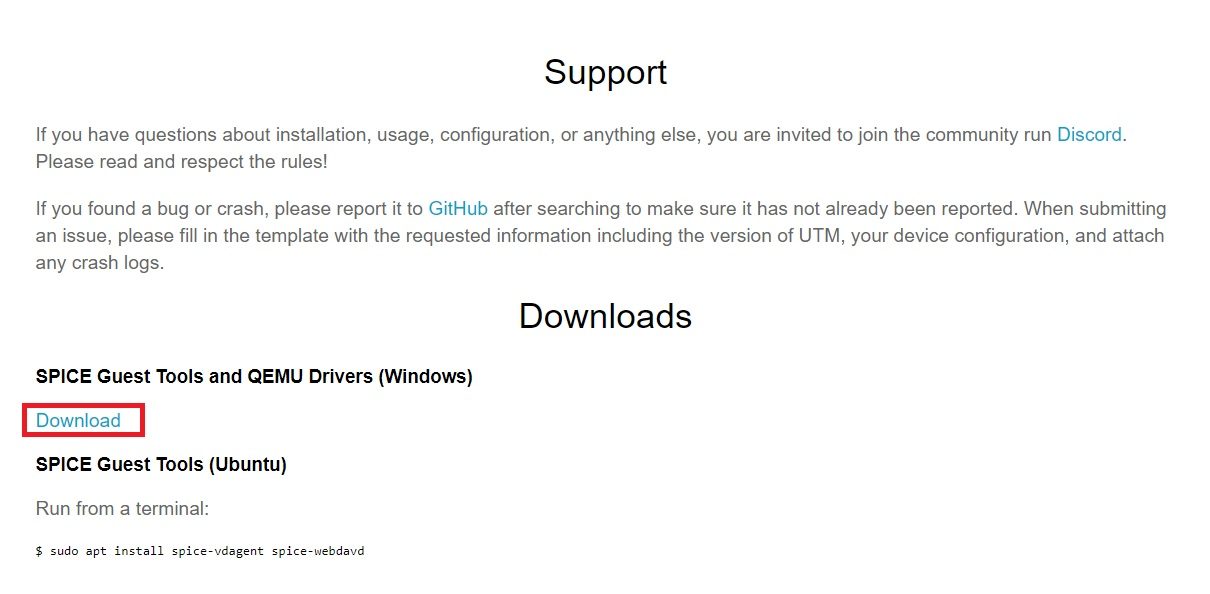
1. To download all drivers, click here and download the Spice Guest Tools and QEMU Drivers.
2. Now, you need to mount the Spice Guest Tools as a DVD ISO. To do that, open UTM, click on CD/DVD, and click the Browse button. Select the ISO file and click on Open.
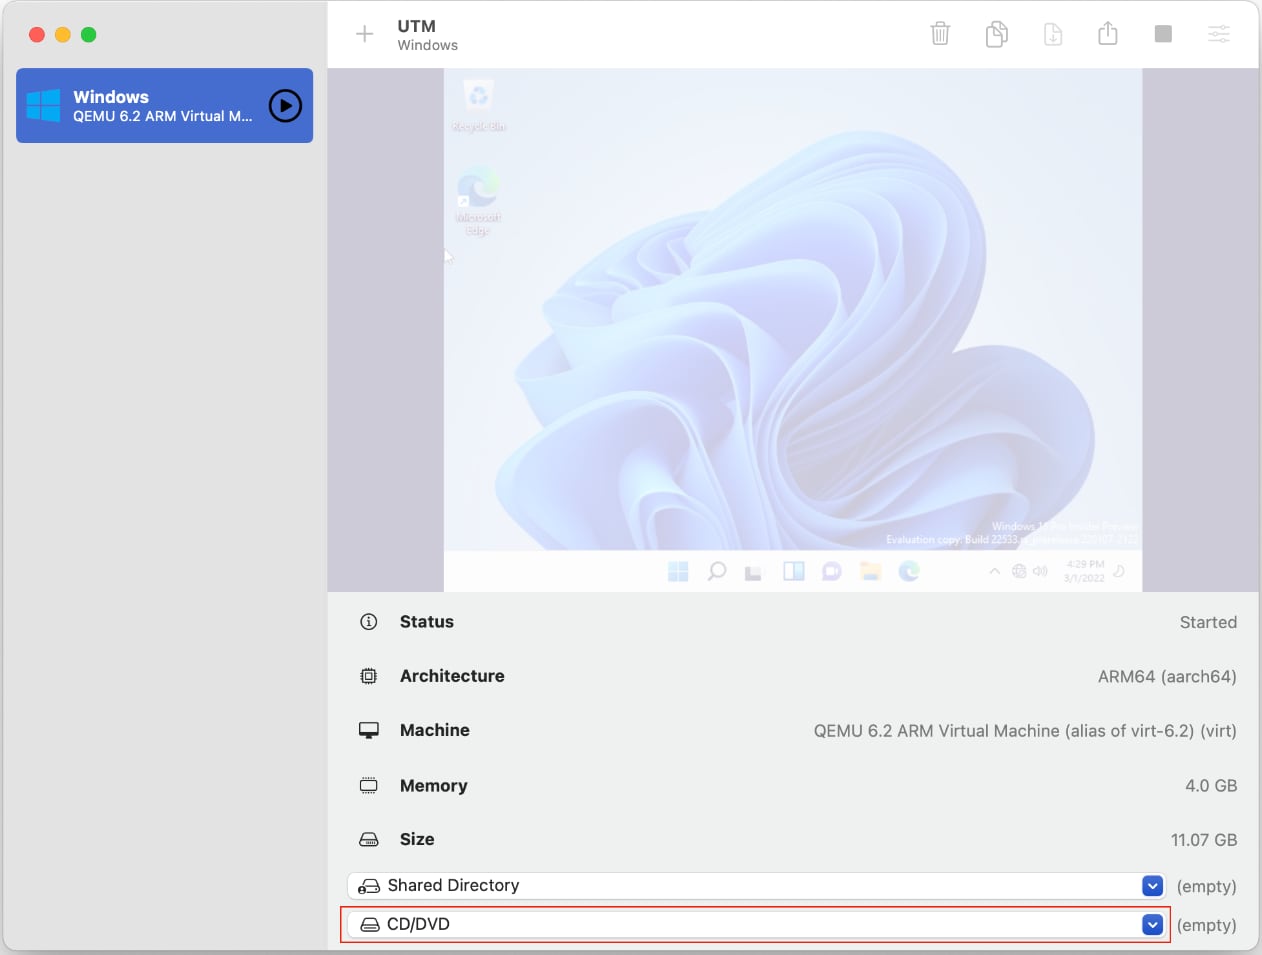
Once you do the abovementioned step, the ISO will be mounted as a CD in the virtual machine.
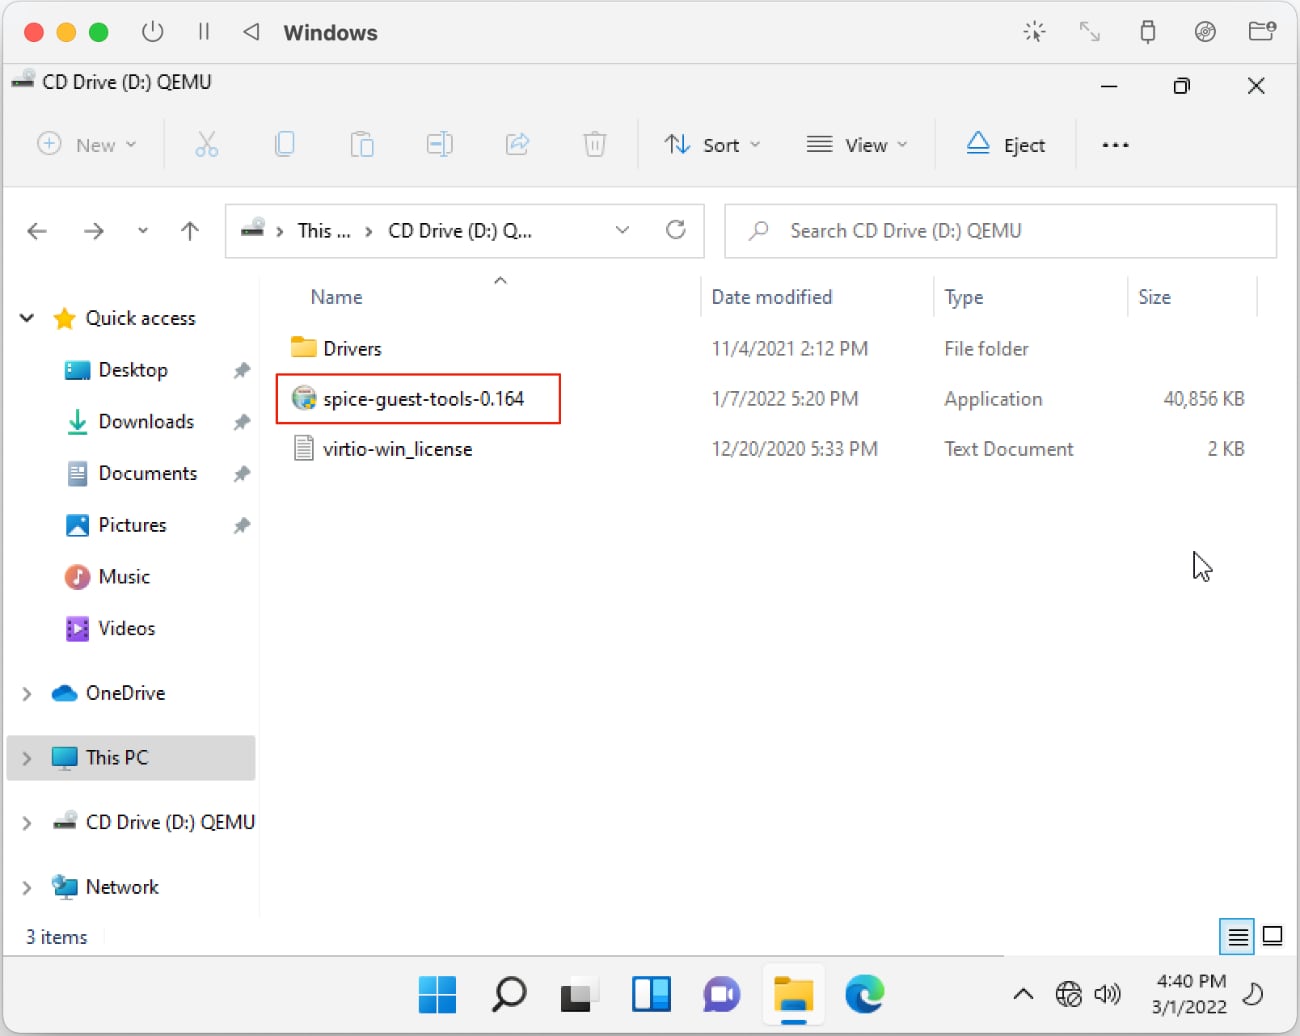
3. Now, inside the virtual Windows 11 machine, open the CD drive and look for the Spice Guest tools. Double click on it and install the drivers.
4. After you finish the installation process, restart Windows in the virtual machine.
Change the screen resolution on Windows 11 on the virtual machine
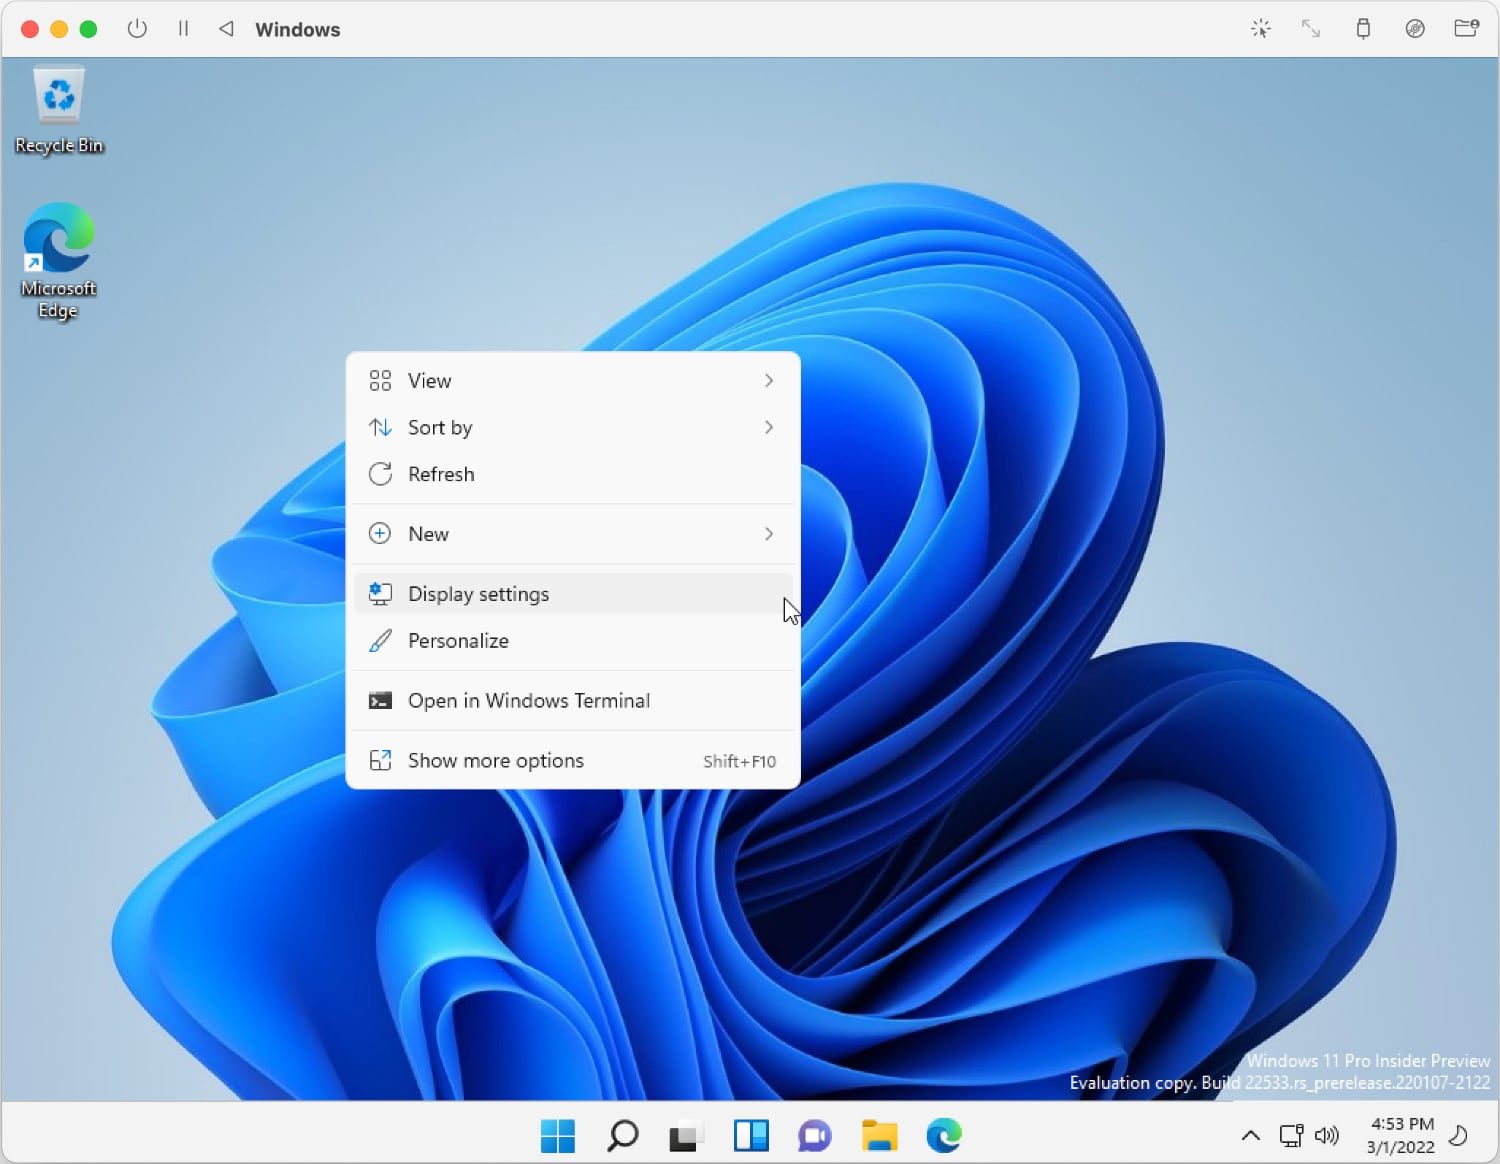
1. Next up, we’ll set the resolution on the virtual machine. For doing that, right-click and select Display settings.
2. Now, select a higher resolution. An ideal resolution could be 1920 x 1080 pixels, i.e., Full-HD resolution.
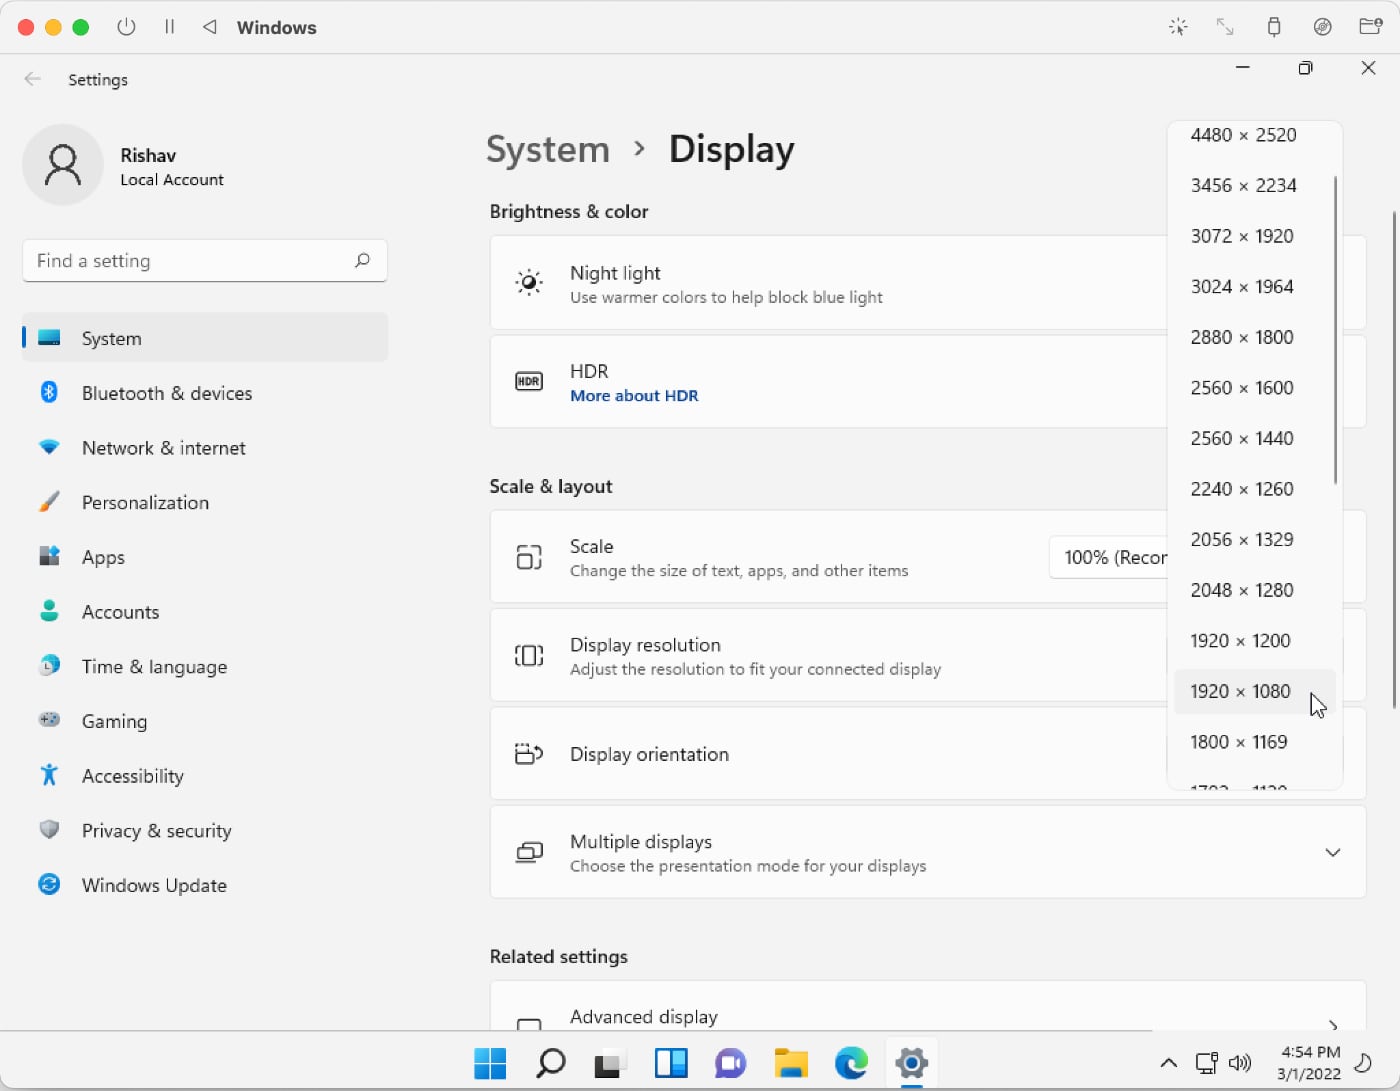
3. Click on Keep changes. Now, press the Control + option on your keyboard to bring up the mouse cursor and make it full screen by clicking on the green maximize button.
4. Lastly, restart Windows on the virtual machine.
There you go! Now, you’ll see the full-fledged Windows 11 installed on your Mac.
That’s how you can easily run Windows 11 virtually on Macs using UTM for free.
Why Use UTM over Parallels and VMware?
Parallels and VMware are two popular apps for running VM (virtual machine) software on your Mac. However, running virtual machine software on Mac devices comes at a price.
Parallels, which is one of the most-used apps for running VM software on Macs, only offers 14 days of a free trial.
After the free trial, users need to pay $79.99 for the standard edition and $99.99 per year for the pro edition.
On the other hand, VMware, which is currently free, comes with a very limited set of options, and also the performance is slower than UTM.
Well, in case you don’t want to pay a hefty price for running virtual machine software on your Mac, UTM is best for you.
UTM is completely free, so it is a great alternative to Parallels and VMware.
Is UTM better than Parallels and VMware?
UTM is an easy-to-use open-source software that brings easy installation and lets you run Windows apps on your Mac for free. However, since it’s free, it does have certain limitations.
The software that you install using UTM won’t offer as high performance as Parallels. But if you want to run free apps and experiment with the latest Windows 11 on your Mac, then it is a great tool.
Unlike Parallels, which actually offers smooth gameplay of Windows games on Mac virtually, the UTM software only helps you get a taste of the latest Windows on your system.
That being said, you can run the Windows apps, but it won’t let you play new games since it doesn’t support GPU virtualization as of yet. Also, it lacks support for DirectX and OpenGL.
However, it is worth noting that you will be able to play older titles using software rendering options. So, UTM is great, but not for serious gaming.
Will I only be able to run Windows OS on Macs with UTM?
UTM not only lets you install the latest Windows 11 on your Mac, but you can also virtually install older Windows iterations and other OS’ like Ubuntu, Debian, and Arch Linux.
Comments