Virtualization is the process of creating a virtual version of computer elements. It is possible to create multiple separate environments, called virtual machines, in a single system through virtualization. This is what attracts users to enable virtualization on their PC.
Each of these virtual machines (VM) is isolated and is entirely different from the other. Each VM can run like a separate system in which you can install apps and programs separately.
Also read: How to install Windows 11 on VirtualBox
Table of Contents
Types of virtualization
Virtualization can be of many types, such as Operating system virtualization, Network virtualization, Hardware virtualization, Application virtualization, Storage virtualization, etc.
Enabling virtualization on an operating system (OS) allows multiple virtual machines to be handled on a single system by a single user. Each of these virtual machines operates as if they are a separate device.
Advantages of virtualization
Virtualization helps to use resources more efficiently and effectively as it is possible to operate multiple virtual machines on a single system. The hardware elements, software, memory, storage, and power are all utilized much more efficiently than they would be if each of the virtual machines were operated on a separate system.
It can vastly reduce expenses and operating costs. Virtualization also enables ease of access to all of these virtual machines, as it is not required to log in to multiple systems to access each one of them.
Also read: How to speed up Windows 10 and improve performance
Through virtualization, it is possible to operate different virtual machines like separate devices; without interfering with the other virtual machines. This makes one feel as if they can access multiple computers on the same system.
Hypervisors
Hypervisors are programs that enable virtualization. Hyper-V splits resources from the system and allocates the given resources to each virtual machine, hence preventing overlapping.
Hypervisors are of two types: Type 1 hypervisor, known as the Bare-Metal hypervisor and Type 2 hypervisor, known as the Hosted hypervisor.
VMware run by Dell, Hyper-V by Microsoft, and Linux’s KVM is popular examples of hypervisors.
Also read: How to enable and customize dark mode in Windows 10
How to enable virtualization in Windows 10
Is it possible to enable virtualization on Windows 10? The answer is yes. It is one of the most powerful and awesome features that can be carried out on your Windows 10. Virtualization is carried out by Microsoft’s hypervisor called Hyper-V.
However, there are some prerequisites for this feature to be enabled. They are as listed below:
- Windows Pro or Enterprise; Virtualization is not possible on Windows 10 Home edition as Hyper-V is not supported on it.
- A 64-bit, SLAT (Secondary Level Address Translation) processor.
- Enable virtualization on the BIOS.
This brings us to the question of how to enable virtualization on Windows 10 devices? Listed below are the steps to enable virtualization.
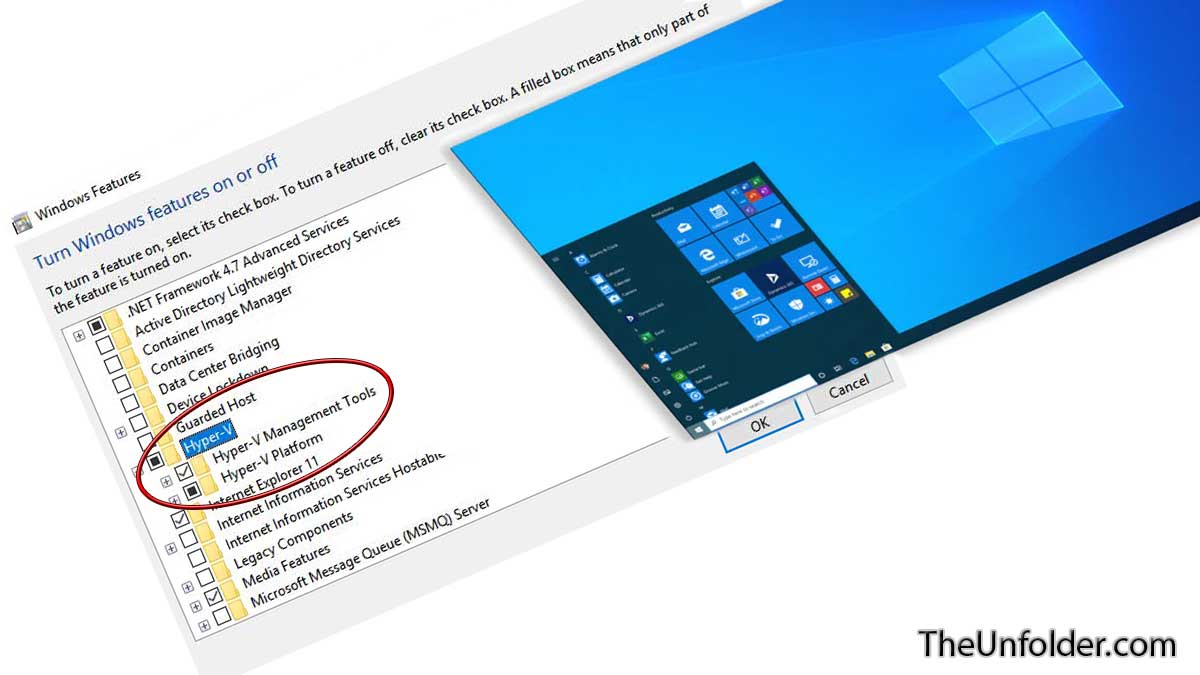
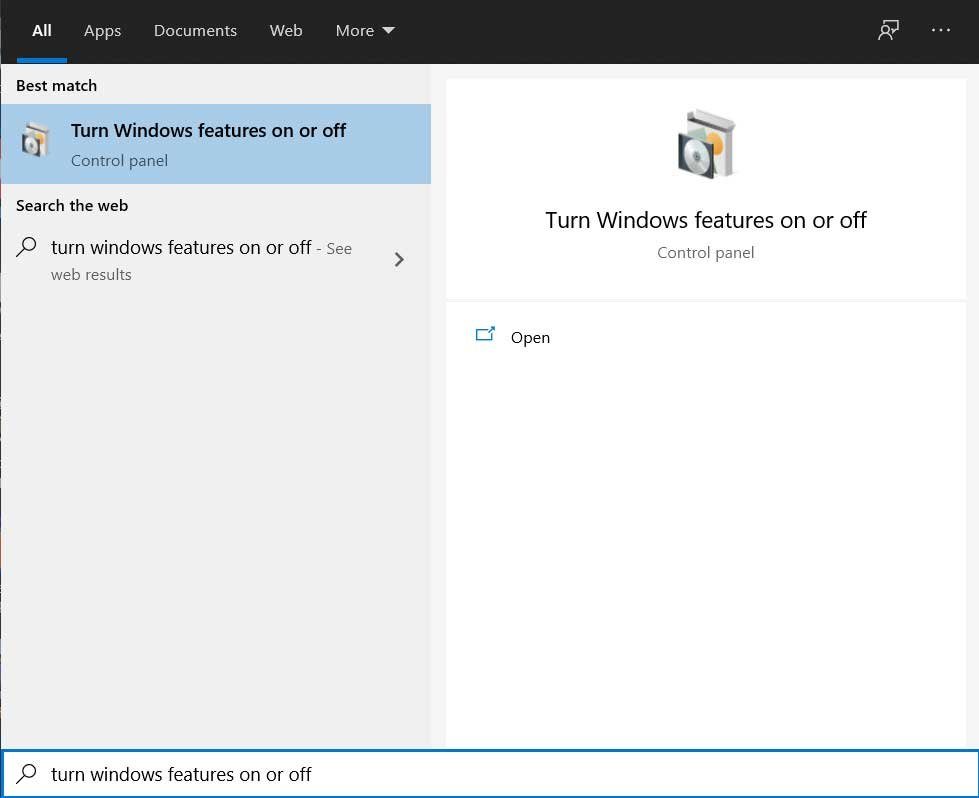
- Open the Windows search tab
- Type “Turn Windows features on or off” and open the program that pops up.
- Check the box next to “Hyper-V” to enable the hypervisor to operate and click “OK”.

- Necessary files required to enable virtualization will start getting installed.
- You will be asked to reboot the computer along with a pop-up.
- Click “Restart now”.
Here, you have completed enabling Hyper-V and the virtualization part.
You can now create and run virtual machines on your computer! To make your first virtual machine, follow the given steps:
- In the Windows search tab, type ‘Control Panel’ and open it.
- Click on ‘Administrative Tools’.
- Once it opens, you can see the ‘Hyper-V Manager‘. Click on it to open.
- On Hyper-V manager, you will see the User’s name on the left. Click on it to start working.
- Under ‘Action’ menu on the top bar, select ‘New’ and click on ‘Virtual machine’. Else, click on the ‘New’ under the ‘Actions’ tab on the right side of the program and select ‘Virtual machine’.
- The ‘New Virtual Machine Wizard’ will pop up.
- Tap on ‘Finish’ to complete setting up a basic virtual machine. Now click ‘Next’ if you wish to create a customized virtual machine.
- You will see the newly created virtual machine in the Hyper-V program.
Comments